Tuesday, March 17, 2009

All Dun...er I mean All Done.

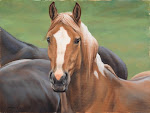
So happy to have finished this piece in a week and at how well it turned out. Especially pleased with how well the mane turned out, and of course that FACE! I wanted to capture that relaxed but abit on the tense side expression. This horse was in a pen at the Stampede Rodeo, and he and his pen mate were resting in the afternoon sun, both very aware of their surroundings. Not too worried, yet...but the tension is apparent in the tightness of the lips and nostril. It may not be visible on the monitor, but the eye is actually looking at the viewer.

Once the face was dry I dry brushed in a bluish violet, very light in tone into the face to pull out the highlights. Try as I might, struggle that I do with working wet into wet, I still resort to my *drawing* techniques with my paintings. I really need to forget trying to paint like someone else, and just work with what's best for me. I think this topic can be a blog all on its own...Hmmmm?

I am going to call this one "Almost Dun", because it is a portrait of a Buckskin, not to be mistaken for a Dun, which sports a dorsal stripe down the spine. So this horse is Almost a Dun. Time for some varnish, and a frame. Woohoo!

Anyhow, I can now shout those two favourite little words and do a little celebration..."I'M DONE!"

Sunday, March 15, 2009


The top photograph is the painting on my easel, with the two reference photos taped up next to the painting. The smaller reference photo on the upper left, is taped off to the same proportions as the painting. I tend to get *lost* in my reference if I don't do this, and I find it incredibly helpful to do this as my eye won't needlessly wander around. This smaller photo is also redder in colour than the larger one on the lower right hand side, and it is this one that I used the most. The larger one allowed me to see some details, that the smaller one didn't.
I painted in the horse's back, leaving the brushwork looser, and not as detailed as the face. This was painted wet into wet. However more detail in the face, including the wrinkles behind the jaw, are worked in over dry paint, allowing for more control. Try as I might, I find it really hard to work a painting start to finish while it is all wet. It gets outta control way too easily. I prefer to leave it when it starts to look good and let it dry. Rarely, I get it right the first time around, and I don't need to go back into it to correct problem areas. I have learned to be patient, stop just before things get out of control and let it dry.
The second photo shows the horse's face more detailed around the muzzle, the *varnish* marking on his face is toned down considerably with some dry brushing technique. The eye has been dealt with more, making it almost complete. The shadowed part of the mane has also been blocked in over top the reddish underpainting.
I just LOVE the ears on this horse! I am so proud of those ears, the way I handled the transistion from sunlit to shadowed areas...YEAH!!

Sunday, March 8, 2009

Phase two of Almost Dun


In this next step, I have blocked in the darkest tones, and mid-tones beside one another on the muzzle, under the jaw and cheek. I used a darker mixture of the payne's gray and burnt sienna, and for the mid-tone lightened it with some of the perm. rose, blue and some white. I may have used a tad of the raw sienna...unfortunately I don't remember exactly what I did...I just mess around with the colours on my palette until I get what I want. I'm not afraid to try mixing various combinations of colour and then putting on the canvas. If its totally gross, I wipe it off.

With the two tones painted next to one another, I then clean the brush I'm using and scribble the two together, at right angles to the original brush strokes. Then if I want a smoother transistion still, I'll go at it again, blending at a right angle to those strokes. I like to work my paint from light to dark, or dark to light. I don't paint back and forth into the different tones, as it can result in mud.

Working into the face more, I started to use the lighter colours like the Naples yellow, raw sienna, and light blue, blending as I go. Buckskins can have some greenish weird colours happening and I constantly had to cross reference my photos to be sure I was on track. This particular horse, has some masking on his face, which created a funny looking dark streak across his cheek, but I couldn't *fix* it at this point. I try to be patient, and not overwork the paint. I let it dry most times, and clean thing up later with glazing or dry brushing or just painting out the offending area.
Its really a treat to see the little flashes of the warm colour peek out, that I toned in at the underpainting stage.

Saturday, March 7, 2009

"Almost Dun"


Just in case no one noticed, it has been sometime since I've posted anything on this blog. Not like I haven't been working on artwork. I have been. I just haven't had the mental energy to want to write it down. This painting was actually started about two years ago and has been collecting dust in the closet. It is a portrait of two buckskin bucking horses, in a holding pen at the Calgary Stampede rodeo. Once I got around to digging it outta the closet and get back to it, I was surprised that it only took me a week to finish it. It just seems to have *painted* itself.

I started with an under painting of Burnt Umber, Underpainting White and thinner on a stretched 12 X14" Gotrick canvas, and once it was dry, I stained the whole canvas with a thinned down wash of Transparent Red Oxide oil paint. This ground gives the painting a wonderful glow, and little snippets of this colour shine through the brushstrokes that follow . The underbelly of the horse in behind has been started. The photo shows the colour to be a greener than it really is.

The colours used in my palette included, Titanium White, Burnt Umber, Burnt Sienna, Raw Sienna, Cadmium Orange, Naples Yellow, Naples Yellow Pale, Permanent Rose, Cerulean Blue, and Paynes Gray.